Friday, November 21

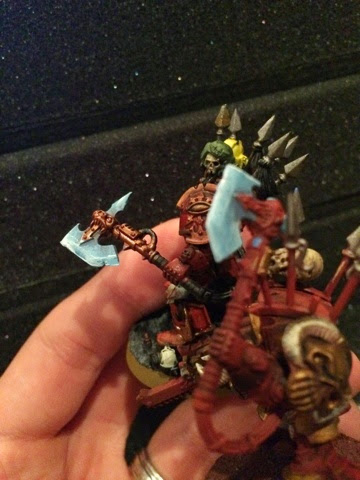
Urläg Blackfang, Warlord of the Blackfang Warhost

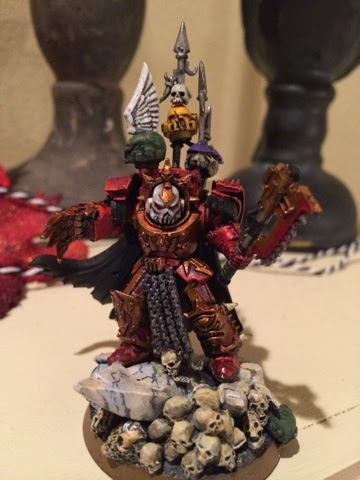
I finally finished painting Urläg Blackfang, Chosen of Khorne, Herald of Terror, and commander of the Blackfang Warhost.  It took some time to settle on a model that was impressive enough to stand in for this hero I have dreamed up.  His vast army of followers comprises the traitor marines that followed him during the Heresy, as well as thousands of renegade guardsmen, who have been madly devoted to the promises of dark power.  Entire tank companies, whole infantry battalions, and enough warships to be considered a small navy have been drawn to the crusade from previously loyal Astra Militarum forces.  This renegade force is formidable enough, but with the added might of traitor Astartes, they are a grave threat to any who stand in their path.  Their Black Crusade is bent to the whims of the gods they serve, and will stop at nothing until complete glory is attained.  These are some bad dudes.

Urläg is a former Space Wolf Legion sergeant who succumbed to the hubris of his own superhuman quality. He, with his elite cadre of terminator-armor clad warriors, fully embraced the allure of Khorne's need for bloodshed.  After Prospero, Urläg's trusted ally, Hrodîr, a venerable Rune Priest who was himself was feeling the taint of chaos, had convinced Urläg to embrace his own destiny as something greater than what the pitiful Space Wolves had envisioned.

  
Some of the skulls and minor details have to be completed, but this is essentially done!
With the completion of this model, I have Urläg and his bodyguard of Huscarls finished, painted, and ready to carve their way into enemy defenses.  Next up, I'll need to paint another squad of marines (maybe my berserkers), which are far less entertaining than terminators. 

Thursday, November 20

Artillery Battery Reporting!

My chaos space marines are nearly all built, with their vehicles, daemons, and other goodies - this leaves me with a large bulk of modeling left to be done for my renegade guardsmen.

This far I've only built 35 infantry models (one full platoon of three squads with command section), three mortar teams, and two lascannon teams.  It's time to bring in the big guns!

A pair of Wyvern / Hydra self-propelled artillery will compliment my army's theme as city-fighting heavy combat engineers, employing their man-portable mortars as well as the impressive Wyverns to rain shells on entrenched enemies.

So looking at the kit, I was impressed.  The new kits that have been produced are top notch, in my opinion.  Great sprue layouts, intelligent mould lines (conveniently on hidden faces of components), and many movable parts!

Step 1 was to figure out if there was an opportunity for an LED - the only viable source on the model is the large spotlight on the front of the shield.  Instead of a headlight, I opted for a single red "targeting computer" which will tie the red color of my Marine army into these renegades (the renegade scheme will likely be a dusty brown), and add some nice atmospheric lighting during games.

The method for lighting a vehicle can be found in a recent blog post, the same principle applies here, though it was admittedly a little trickier having to route wires through the pivot point of the main weapon on this one. 
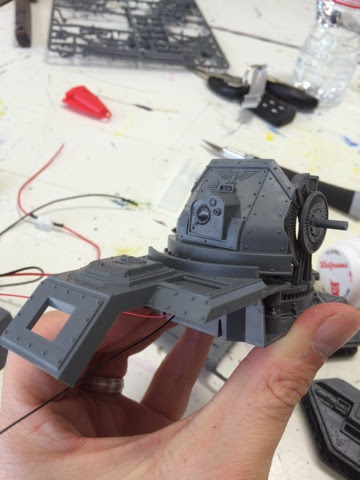
The OCD in me loves that lal my 5mm LEDs fit perfectly into most GW model kits.

Above, you can see the very slow-but-steady approach to lighting a model with LEDs.  Checking and re-checking to make sure everything jives is paramount, and as I was doing it on a lunch break with a handful of students watching (and asking questions!) it paid to go slowly.

It's aliiiiiiive!

Battery fits!  I ran out of coin batteries, so shoved a full 9v into the crew compartment.  A nearly perfect for, just opened a gap to give it some breathing room for easier access to replace a dead battery.
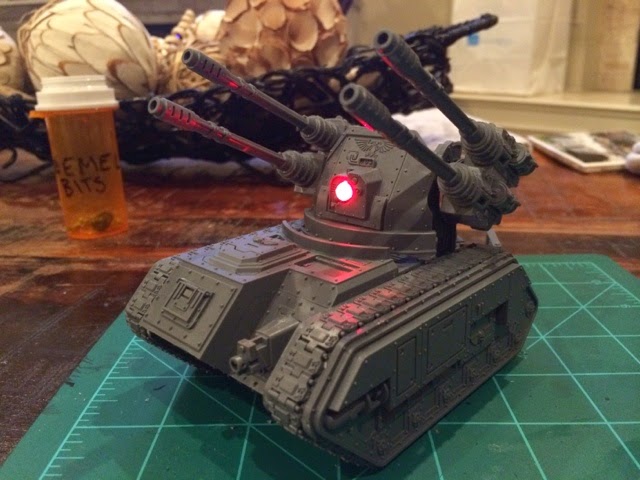
Computer tracking online!

All done!  Just needs a little bit of chaos love - some chains, carvings, skulls or spikes?  Then it's off to build the second one, then paint the beasts, finally resulting in anti-loyalist firepower for Kyle to deal with!

Now where did I out that can of brown spray paint..?

Tuesday, October 28

Eldar?

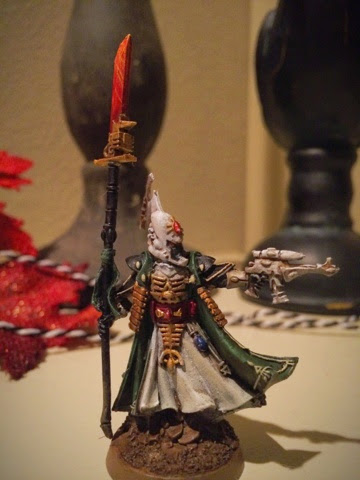
I think I mentioned (and if I didn't, here you go!) that we had a 1,500 point Eldar force donated to the Warhammer club I run at work.  My students are spearheading the painting of the units but wanted me to help out.  I decided to give the Farseer a once-over to get him presentable, so here he is!

Foul Xenos!

He'll soon be causing all kinds of mischief at our school games and potentially make some appearances in the campaign!

On a slightly related note, I began a Napoleonic French historical army for the Black Powder rule set, intending to use the ever-talented Perry Brothers minuatures (Games Workshop transplants).  We may have a non-warhammer feature page here, or I'll just include occasional snippets if not - but don't worry!  The Blackfang Warband is still growing in power... and I'm eager to get those Renegades painted!  I'll have a more comprehensive write-up soon!

Sunday, October 5

How-To: Lighting a Vehicle with LEDs

Everywhere I go with my army or terrain, people marvel at my headlights and interior illumination on my vehicles, or the red landing lights on my Skyshield Landing Pad.  I went to my local Games Workshop store this Saturday and everyone couldn't stop talking about how cool it was to have vehicles that lit up, and that they couldn't do that sort of stuff.  This got me thinking - those guys could easily do these sorts of things!

My land raider was the first time I've ever used LED wiring components in my entire life, and it was ridiculously easy.  Much easier than I anticipated.  I've recently acquired a Rhino transport for my Berserkers (or maybe Chosen, haven't decided yet), and figured I'd use this opportunity to do a step-by-step for anyone curious or scared at the idea of dealing with LEDs.

All materials for wiring and lighting came from Evans Design.  I find them to be the best quality, and alarmingly straightforward - they come pre-wired!  You simply match the voltage (there are only two options) with the associated LED you want, and connect the wires.  Twist black to black, and red to red and the connection is made, you're good to go! 

The hardest part is deciding what colors you want!  In my example below I used two 3mm "warm white" LEDs for the headlights and one 5mm Green for my interior lighting, all 3v.  I also used the coin battery with toggle switch.  My Land Raider used the 5mm LEDs for its headlamps, if that gives you any indication on scale.  You could make either work, honestly, so don't get too worried with matching the size exactly. 

Without further ado, here's my Rhino tutorial, but the project can be scaled up and made much more complex.  This is simply a basic framework from which you can experiment and learn new techniques!

Let's go!

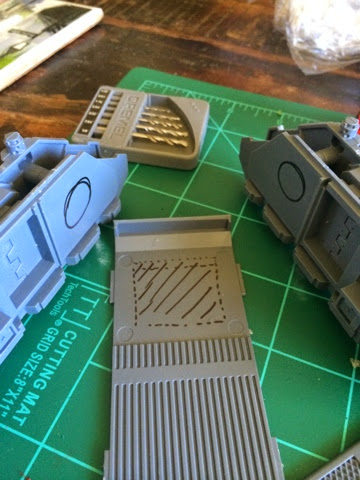
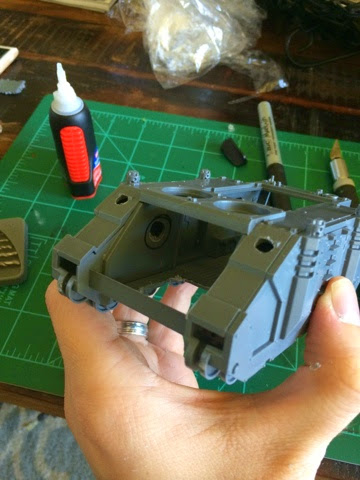
1. Always dry-fit the pieces together (especially vehicles!) to make sure there are no problems in later steps.  This also gives you a broad view at where components will be placed, and allow moving parts to be accounted for.  In this example, I've decided to put the battery and switch in the driver compartment (smooth surface) and the wiring in the track guards.  The track guards on vehicles is usually the best place to route headlamp wires, as it's out of sight of interior space.  If you're one of the guys that glues the rear ramps shut, you have much more room to play with, and can even fit a 9v battery in there for some serious "Christmas Tree" scenarios.


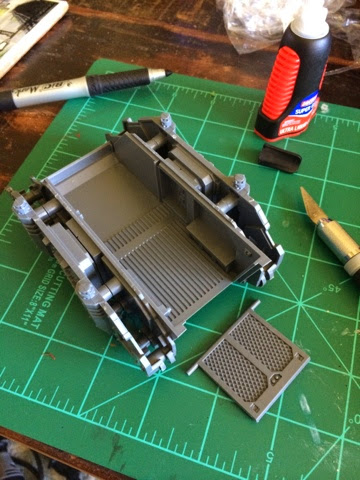
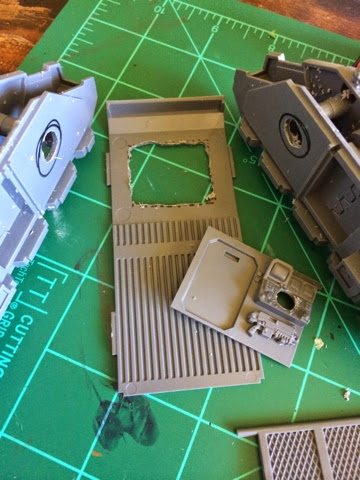
2. Here I've taken the Rhino apart again, and marked out where I'll dremel out the gaps.  The square below the driver compartment will be cut away and allow access to replacement batteries and the toggle switch - remember to make it large enough for fingers to manipulate the switch or remove a battery!  The round holes is where the wiring will be fed to the headlamps.  Not pictured are the top plates of the track guards, Ive drilled out the space where the headlamps connect as well.  Be sure everything lines up and you have enough wire length to reach each of these places!


3. Starting to cut!  These don't need to be clean cuts, they'll all be hidden once I'm done.  The sonar panel section on the command console was conveniently the same size as the 5mm interior green light I want to use, so will work well at disguising the light when not in use.


4. Dry-fit again!  No glue should be used until you are 100% planned out on where things are going, and have double checked to be sure you know where wires are going.  If I were to have glued at this stage, I would need to thread the headlamps from inside the cockpit, and out the front holes, which would be damn near impossible.  Do this in separate stages while it's all unglued, then fit it together once the wiring and LEDs are installed.


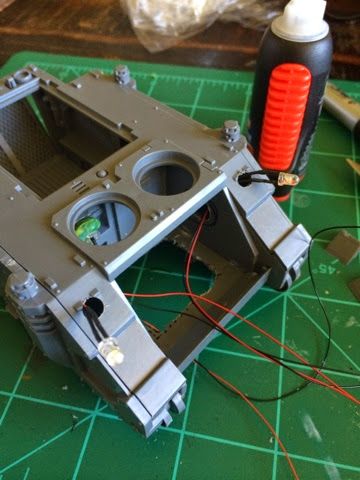
5. Threaded and glued!  The careful observer will note that I made a big mistake here.  See how the wires come out the front plate section (where the windshield would go)?  That's intended.  However, I accidentally threaded two of the wires from below the cockpit (you can see it running under the vehicle) to the interior green light (where the mash of greenstuff is).  I have two sources of wire coming into the center, looped to a battery (out of frame), there is no way to get the entire assembly inside the vehicle!  This meant I had to re-wire the connections, a very tedious (but doable) step that could have been easily avoided had I checked myself.  Planning is everything!  Take these steps slow, and be methodical, you'll be happy in the end.


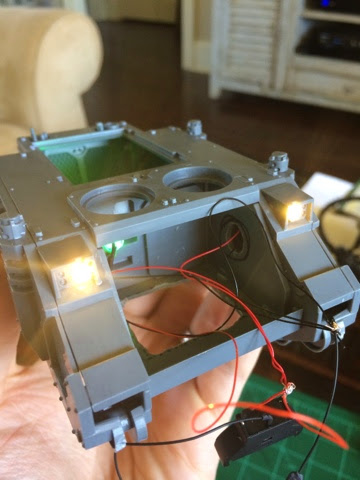
6.  Wiring corrected as per previous step, and testing for good connections.  No flickering, no dimming when the wires are jostled.  Always check to be sure the connections are solid before gluing everything in.  If a wire you twisted together comes loose after it's built and painted, you're probably not getting inside the track guards anytime soon.  I twist and bend my connections, but a better recommendation would be to use electrical tape to make sure its secure.  I try to be thorough, but I was too lazy to go buy tape for this demo.  I wouldn't recommend super glue or anything, as it will likely break the circuit connection.


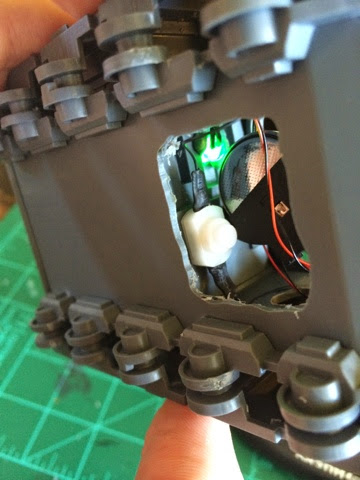
7. Switch is glued into the bulkhead to give leverage when pressing it.  Which is something I neglected on my Land Raider.  On the Land Raider, having to pinch the unit by holding the back and pressing the toggle has taught me this lesson - hindsight is a powerful ally here, you'll certainly make mistakes, but learn from them!  Leave the battery free, however, as there's almost no way to get a disc battery out without gripping the top and bottom.  You'll want the wires a little loose to pull out of the opening as well, to really make it easy.


8. (Optional): Magnets on the bottom will be used to secure a plate to keep the free-floating battery unit from falling out.  It has enough friction and wires tangled up in there to not randomly fall out, but I wanted to be extra safe, as I did with the Land Raider.  I eventually used a spare armor plate that came with the Rhino (the one to make it a Predator turret instead of a top hatch).  This isn't as clean and well-hidden as the Land Raider (the rear power plant on the Land Raider is practically begging to be magnetized), but it serves the same purpose.


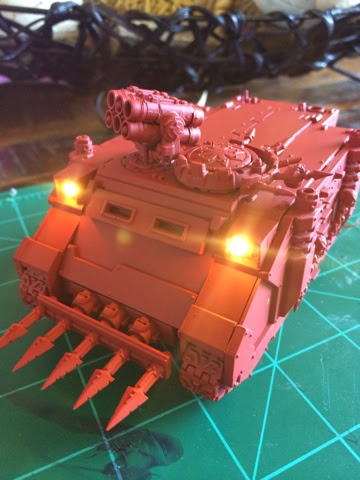
9.  The lighting is done at this point - now it's just painting!  Tape your lights with a small amount of painter's or masking tape.  I spray my vehicles red, and if you do all this work just to spray over it, you're not going to be happy.  Scraping paint off of tiny LED bulbs isn't fun - but it's possible, should you forget.  If you painted the interiors, be sure to tape closed the ramp so you don't get any spillover onto a potentially finished interior.


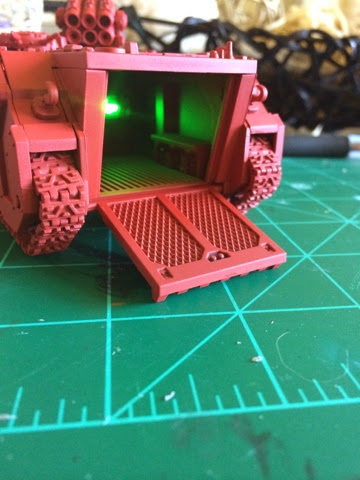
10. Rear shot of interior light, and functional ramp.  I strongly recommend painting interiors before assembling or lighting.  I did on my Land Raider and was very pleased.  The Land Raider has several functional doors and an elaborate interior, so that was a given to paint it carefully.  For this Rhino, I just gave it a quick once-over and was satisfied.  I'll do some detail work later if it strikes my fancy.  I've heard shaving down the rounded LED top to a flat surface diffuses the light more - I've done this for all my interiors, and it appears to work.  Failing to do this you get a circle of light projected straight out, something that isn't conducive to an interior light!


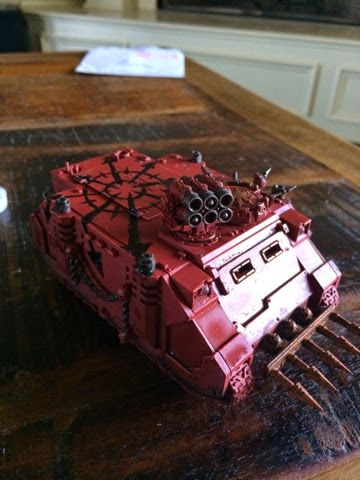
11.  Some freehand designs, a couple of washes, and some edge highlighting and I'm almost home free!  I stopped here after only working a couple of hours - and could honestly be done at this stage.  I'll pick it back up later and detail and weather the model when I have a little more free time.  The overall wash is drying in the image, so it looks a little wet.


There you have it!  A finished Rhino, totally illuminated with LEDs in under two hours.  With the pre-wired kits from this website, I cannot stress how simple and effective it is to add a little something extra to your kits.  The possibilities are endless!  They have LEDs the size of a pencil-point!  You could do Daemon's eyes, individual cockpit indicators in a Valkyrie, terrain illumination - anything!  The above method is simply a basic how-to, there can be a wide range of uses, so get to thinking!

Give it a try, and let me know what you think below!  If you have pictures of your own, please share them, or join the Google+ Warhammer 40k community and let everyone there know!

Blood for the Blood God!  LEDs for the LED throne!

Friday, October 3

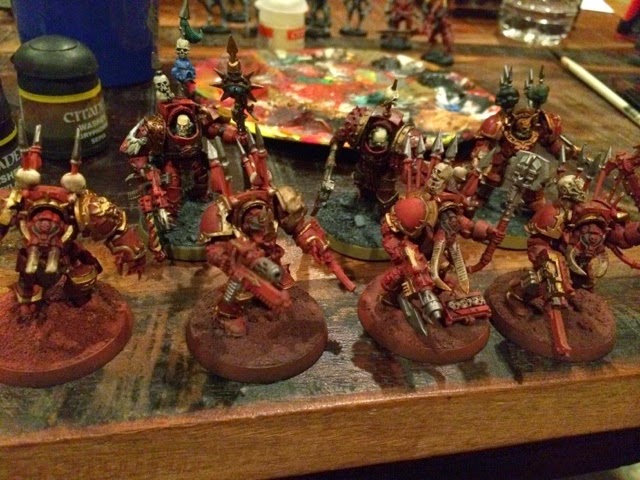
Goal Met - Urläg's Huscarls

Urläg's most loyal followers, his chosen Huscarls, don the ancient Terminator Armor stolen from the armories of the Space Wolves when they turned to Chaos.  Over the many hundreds of years, these once magnificent suits have been warped and bent to the will of Chaos - daubed red from their thousands of victims during intense boarding actions and vanguard assaults.

I decided last night I'd complete a unit, hell-bent on accomplishing the daunting task of painting (to completion) a full unit.  I chose six terminators, and got to work!

Choosing to assembly-line them was a great decision.  I was able to paint them consistently and make them appear to be a cohesive unit, while cutting down on time spent on each model.  Being able to focus on one task, say, the brass shoulder trim on each model, really allowed me to speed the process up.


As usual, the can of red citadel spray paint is a miracle worker for my army.  It takes out the most tedious step in painting figures, the initial base coat!  All I had to do afterward was wash it in a deep red, trim the brass, add metal for gun barrels, various trim colors, eyes, etc, and that's it!  A quick once over for the bases and I had an above-average painted unit in a couple of hours.  They won't win any contests, but they are certainly to a standard I am very happy with.


The toughest decision was picking a color for my power weapons.  Green was my first choice when I painted my first Chaos model, but I've decided I need it to pop more.  A bright blue fits the bill, and has the bonus of being an "icy" weapon, fitting of the Space Wolf theme. 


Overall I'm pleased with the result, and can't wait to knock out my regular marines next (I painted all the fun stuff first, shame on me).  My army is slowly losing it's Hatred: Unpainted curse, and will once more be the scourge of the Van Hassan system!

This also counts as a complete unit for my To-Do list!  Hooray, Khorne!